As I’ve mentioned in a few of my recent posts, the particular meditation technique that I practiced at the Thai Buddhist monastery for twelve hours a day sharpened and developed my mind.
Namely, that it further developed my psychic hearing ability and I was warned in a dream about the trait I must eliminate.
I’m so happy that I’ve finally found a technique that truly sharpens the mind. And not only this – it also gets me into deep states of meditation incredibly fast.
(By the way, you know that you’ve achieved some depth in meditation when you start seeing visions and images. The clearer they are, the deeper the meditation is.)
In this post, therefore, I will share with you this great technique, and I hope it will be as beneficial to you as it was to me.
Meditation technique to sharpen mind and get into deep meditation
This technique involves both walking and sitting. Mindful walking and sitting should be done for equal lengths of time. For example, in the monastery I would walk for an hour, and then would sit for an hour, and then I would again start walking, and after that – sitting (meditating), unless I would take a short break.
If you are new to meditation, you should start walking and sitting for ten minutes only. Thus, you would walk for ten minutes, and then you would sit in meditation for ten minutes. Then you can gradually increase the time of your meditation, at five or ten-minute increments.
Both walking and sitting practices involve quite a few steps. Firstly, I will describe how to do walking meditation.
Walking meditation – the first part of the deep meditation technique
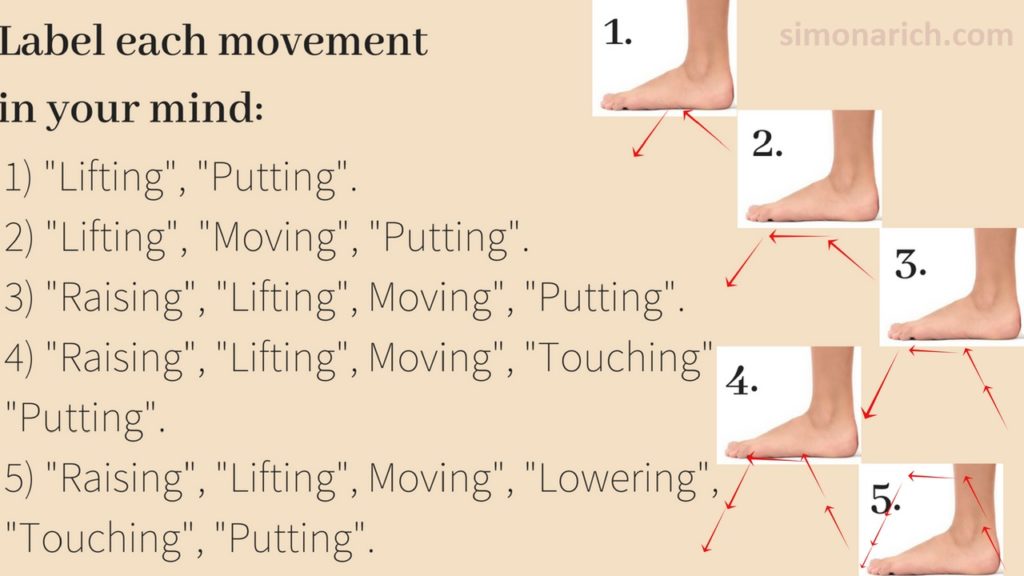
During the first few days you will have to only focus on the lifting and putting of your feet. You should lift your foot flat – without raising the heel off the ground first. When you lift your foot up, you should say in your mind “lifting”, and when you put it down, you should say “putting”.
After a few more days, you should introduce one more movement. You should lift your foot (“lifting”, then move it parallel to the ground (whilst saying “moving), and then put it down (“putting”). Again, the foot should be kept flat.
After a few more days, another movement is introduced. You would need to first raise your heel off the ground (“raising”), then lift the whole foot off the ground (“lifting”), move it (“moving”), and then put it down (“putting”).
After a few more days, another movement should be introduced. Before putting the foot down, you would have to first touch the ground with your toes (“touching”), and only then firmly put your whole foot down (“putting”).
Finally, after a few more days, the final movement is introduced. After moving your foot parallel to the ground, you will have to lower it (“lowering”), then, as in the previous paragraph, put first the toes on the ground (“touching”), and then finally put the whole foot down (“putting”).
Thus, you can see that the final walking meditation involves making six foot movements: “raising”, “lifting”, “moving”, “lowering”, “touching”, “putting”. You should continue walking in such a way throughout the duration of your walking meditation, always being mindful of each of the six movements of your feet.
If this technique is still not clear, please watch the video above as I explain this meditation technique step-by-step.
Sitting meditation – the second part of the deep meditation technique
When you finish walking, you need to straight away sit down to meditate. If you really need to take a break for some reason (like to use a bathroom), it should only take a few minutes long.
You should sit in a comfortable posture, especially if you meditate for an hour or so. In that particular monastery the monks advise not to cross legs. They say that crossed legs are fine for short meditation, but if meditation is long, it cuts off blood supply and causes unnecessary discomfort.
Thus, their most recommended posture looks like this:
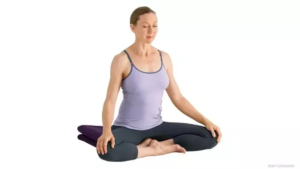
Recommended posture for this meditation
Once you found meditation posture balance and you feel comfortable, you will need to focus on the rising and falling abdomen.
Most people breathe in the wrong way. Indian Yogis as well as Buddhist monks know that the proper way to breathe is into your stomach, rather than stopping at lungs. In this deep meditation you focus on the breath filling your stomach and then the stomach deflating when the breath leaves it.
When the breath fills the stomach, you should acknowledge that by saying in your mind “rising”. Once the breath leaves the stomach, you should say “falling”. Really try to be aware of the breath filling and leaving the stomach, and keep labeling these breath movements throughout the duration of your meditation.
After a few days, you should add another step to your meditation. Not only should you be aware of the rising and falling of your abdomen, but you should also pay attention to the fact that you sit. Thus, after labeling the rising and falling of your abdomen, your attention should be placed on your sitting posture, and then acknowledge that you’re aware of that by labeling it “sitting”.
Thus, when you breathe in, you say “rising”. When you breathe out, you say “falling”. And then you become aware that you sit, and you say “sitting”.
After a few more days, you will need to start focusing on the points of your body. After “rising”, “falling” and “sitting”, the next thing you will need to become aware of is your awareness/mind “touching” a particular point. Of course, when your mind touches that point, you will need to label it as “touching”.
Here are the points to focus on first
After a few more days, you will need to add two more points, and then after a few more days – two more, and so on. Here are the points to keep adding, shown in pairs:
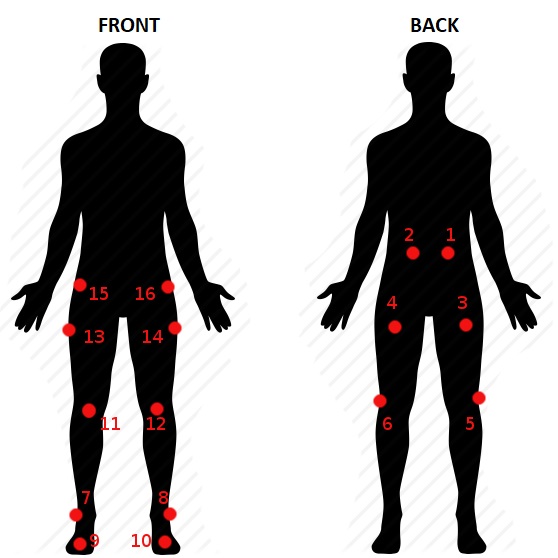
First points to focus on – meditation technique
Finally, you will get to the sequence of steps that’s a little bit more involved, so I’ve illustrated them separately. Thus, when you get to this stage, you will need to focus not on two new points, but on more:
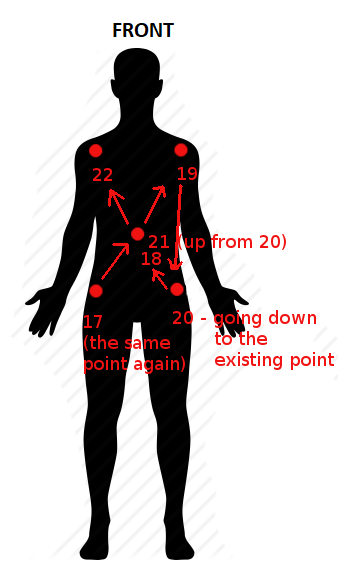
Next point sequence – body front
…And after a few more days you will need to complete the same sequence on your back:
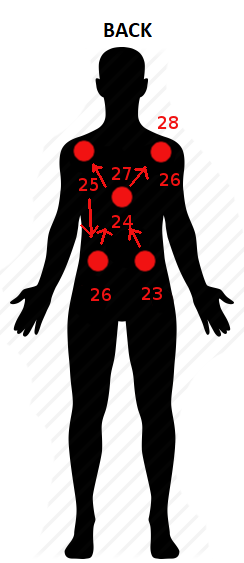
Next point sequence – body back
If this isn’t clear, please watch my video which shows how to do this sequence step by step.
This ends the whole sequence. You will need to continue going through “rising”, “falling”, “sitting” and “touching” of these 28 points over and over again until the end of meditation. That is, unless you are already an experienced meditator and you want to use this technique to get yourself into deep state of meditation fast and to use your usual meditation afterwards.
If that’s the case, then you will need to repeat a few of such sequences until the mind is in the state of meditation. After this, you can continue with your usual meditation. However, if you are a beginner, you should stick to this meditation throughout the duration of your sitting, as it will quickly calm your mind and sharpen/develop it.
That’s because such a level of involvement doesn’t allow the mind to wander, so it has no option but to allow you to get deep into meditation.
Conclusion
I hope I explained this technique clearly, and I hope you will try it.
A monk told to our group that this technique works – otherwise people wouldn’t donate to their temple after completing the meditation course. I experienced it personally – this technique, in a short period of time, deepened my meditation significantly, developed my spiritual skills and the mind became more aware.
I hope it will produce the same results for you.

This is one of the monastery buildings where I learnt this technique.

Hi, I'm Simona Rich, the author of this site.
I'm from Lithuania, though most of the time you'll find me somewhere in Asia.
I write about spirituality and self-improvement, and consult on those topics.
Let's connect on Facebook, Instagram and YouTube. My bio is here...

Tq for the brief but succinct introduction of the techniques. May you be well and happy.
Hi Simona,
It sounds very similar to the zen way of meditation, zazen (sitting meditation) and kinhin (walking meditation).
How about breath meditation? Observing the sensation of inhalation and exhalation on the nosetril or nosetip.